Creating a macOS bootable USB drive (or "bootstick")
- Steve Maser
- Neil Love
- Ed Bobak
If you are having trouble using the "command-option-r" method of booting to show the macOS as an installable operating system for your mac, you can make an installer bootable USB drive to do the installation:
You will need:
16 GB or larger flash drive that can be completely reformatted.
A functional Apple system
The current macOS full installer from the AppStore (if you do not have an account to download things from the AppStore, please contact the Mac Engineering team).
If you need to get an older version of macOS, you can find AppStore links at this page: https://support.apple.com/en-us/HT211683
Process:
Download or otherwise transfer the macOS installer to your /Applications folder.
Important Note
If you download it from the AppStore, it should be approximately 6G - 13G in size. Anything smaller is not the full installer!

- Launch Disk Utility found in Applications → Utilites

- Plug the USB flash drive into the functional system
- In Disk Utility, select your USB flash drive.(You will want to select the device, and not the partition) Click the Erase button.
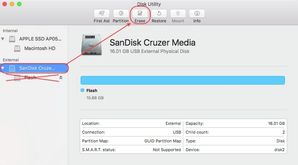
- In the window that appears, select the following options:
Name: 'Untitled'
Format: Mac OS Extened (Journaled)
Scheme: GUID Partition Map
Click Erase
- Once the drive has been erased, quit Disk Utility, open the "Terminal" application and run the following command:
Important Note
The final installer for macOS 12 and later are over 13G, so you will need a 16G boot stick for them!
For Monterey (macOS 12), the command would be:
sudo /Applications/Install\ macOS\ Monterey.app/Contents/Resources/createinstallmedia \
  --volume /Volumes/untitled \
  --nointeraction \
  --downloadassets
For Ventura (macOS 13), the command would be:
sudo /Applications/Install\ macOS\ Ventura.app/Contents/Resources/createinstallmedia \
  --volume /Volumes/untitled \
  --nointeraction \
  --downloadassets
For Sonoma (macOS 14), the command would be:
sudo /Applications/Install\ macOS\ Sonoma.app/Contents/Resources/createinstallmedia \
  --volume /Volumes/untitled \
  --nointeraction \
  --downloadassets
Important Note
The final installer for macOS 10.15 is over 8G in size – and macOS 11 and later are over 12G, so you will need a 16G boot stick for them!
When the command has finished running and you return to the command prompt, your "Untitled" USB drive will be named "Install macOS Big Sur" (or "Catalina" or "Monterey", etc...) and then you can use that to boot your mac by inserting the USB drive and starting the computer holding down the "option" ⌘ key to erase the computers internal hard disk and then install macOS for non-Apple-Silicon macs.
For Apple Silicon ("M1", etc) Macs, you would boot them holding down the power key until you see the "Startup Options" to be able to select your USB drive for startup. You can then follow this link as to how to wipe-and-reload a system after that!