IzzyStor Documentation
- Doug Heady (Unlicensed)
- Steve Maser
- Neil Love
- Ed Bobak
How to format a drive for use with IzzyStor
IzzyStor Notes & Requirements
The IzzyStor application can be obtained from http://izzy.dsc.umich.edu on the top left, under “Tools.”
IzzyStor requires an active Ethernet or Wireless connection to run. IzzyStor verifies usernames (uniqnames) with UM Active Directory. IzzyStor automatically verifies if you have a network connection at Startup.
IzzyStor migrations should only be performed while the computer is connected to power.
IzzyStor requires an external drive to capture the backup image. Disconnect any other external hard drives, flash drives, or peripherals. How to format a drive for use with IzzyStor
IzzyStor backup requires an account with administrator privileges other than the account(s) being migrated. If an alternative Administrator account is not available, one will need to be created.
IzzyStor backs up everything under /Users (with the exception of a few cache and preference files). If user data is stored in other locations on the hard drive it will not be backed up by IzzyStor. It is important to check for user data stored on other locations on the hard drive and back up manually as required.
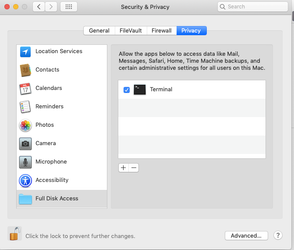
IMPORTANT NOTE FOR macOS 10.14 and later – you must add "Terminal" to the list of applications that have "Full Disk Access" in order to make the archive (this is not needed to restore)
macOS 10.14 (and later) marks some User account folders "private" from general access.
In order to make an IzzyStor Archive of a 10.14 through macOS 12 system, you must do the following:
• Open System Preferences and go to "Security & Privacy"
• Go the "Privacy" tab and click the lock to make changes.
• In the "Full Disk Access" section add the "Terminal" application (located in /Applications/Utilities):
In order to make an IzzyStor Archive of a macOS 13 and later system, you must do the following:
• Open System Settings and go to "Privacy & Security"
• In the "Full Disk Access" section add the "Terminal" application (located in /Applications/Utilities):

Once you have done that, you will then be able to do a successful "Archive" as indicated below.
Creating a IzzyStor Archive
Open "Run IzzyStor"
For macOS 10.14 and earlier – just double-click on "Run IzzyStor.command". This will launch the "Terminal" application and follow the instructions in that window.
For macOS 10.15 through macOS 14, the steps to launch IzzyStor are a bit more complex and require these three steps:
1 – Control-click on "helper" and select "Open". You will get a "Malicious Software" dialog box. Say "OK" on that.
2 – Control-click on "helper and select "Open" a second time. You will get an "Open" option in a slightly different dialog box. Click "Open". This will tell you to "Run IzzyStor.command" instead.
3 – Control-click on "Run IzzyStore.command" and select "open". This should give you a dialog box with "Open". Click that and the "Terminal" application will open and follow the instructions in that Window.
For macOS 15 and up, the steps to launch IzzyStor are a bit more complex and require these three steps:
1 - Control-click on "helper and select "Open".. You will get a "not opened" dialog box. Click "Done" on that. After this, open System Settings and go to "Privacy & Security". Scroll to the bottom where you will see "helper was blocked to protect your Mac". Click "Open Anyway" and follow the prompts to "Open Anyway" again and then enter your admin password.
2 – Then, control-click on "Run IzzyStore.command" and select "open". This should give you a dialog box with "Done" and "Move To Trash". Click "Done". After this, open System Settings and go to "Privacy & Security". Scroll to the bottom where you will see "Run IzzyStore.command was blocked to protect your Mac". Click "Open Anyway" and follow the prompts to to "Open Anyway" again and then enter your admin password. Click that and the "Terminal" application will open and follow the instructions in that Window.
When the IzzyStor application has finally launched, select the “Archive” option.
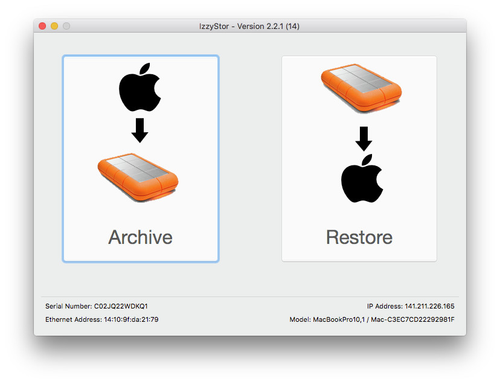
To initiate the backup, choose Archive. You will be prompted to authenticate with admin credentials. This will bring you to the IzzyStor – Archive window
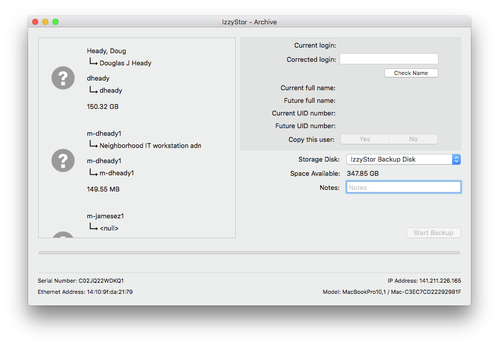
Select Users to be migrated
On the left side of the screen you will see a list of all of the user accounts on the machine. Select the first user, then on the right side of the screen, choose whether or not you want to Copy this user: Yes | No. You must make a decision as to whether you are copying each user’s data or you will not be able to start the backup. The greyed-out question mark will change to a green checkmark for Yes or a red X for No.
Verify user(s) uniqnames
As you are selecting user(s) whose data you will want to restore (marking green checkbox), make sure that the “Corrected login” field contains the correct uniqname for each user being archived. If it is not correct, type in the correct uniqname and select “Check Name.” This will populate the correct uniqname and UID number onto the system where the user data will be restored.
It is required for the “Corrected login:” field be populated with valid UM uniqname. It is also important to verify that when entering a “Corrected login:” uniqname value, that this uniqname matches that of the owner of the data. It is possible a user account on the system can have the wrong name for their account but it matches someone else’s uniqname so it will not be greyed-out like its wrong, but it is still incorrect.
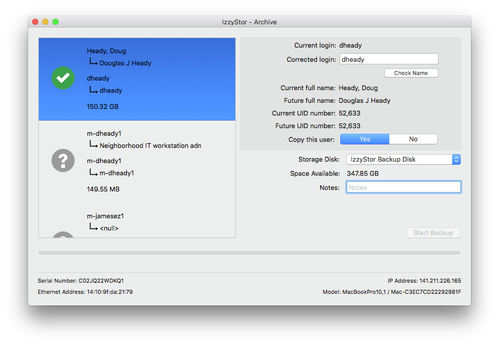
In the example below all accounts have been selected and the “Start Backup” button is now active.
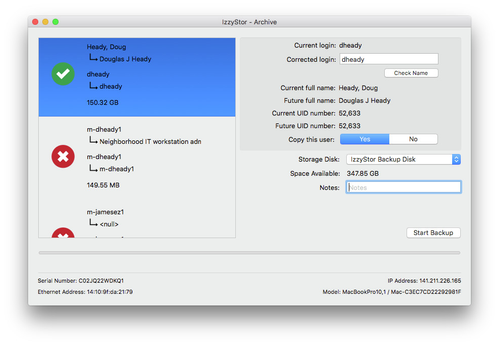
Validate Backup Destination Disk
At this time, confirm you have the correct disk selected for the drop-down “Storage Disk:” menu. It is absolutely essential to this process that you select the proper storage destination, which would be the name of your backup drive.
Start Backup
When you are ready to backup data, click the “Start Backup” button.
You be presented with backup status progress along the bottom of the IzzyStor – Archive window.
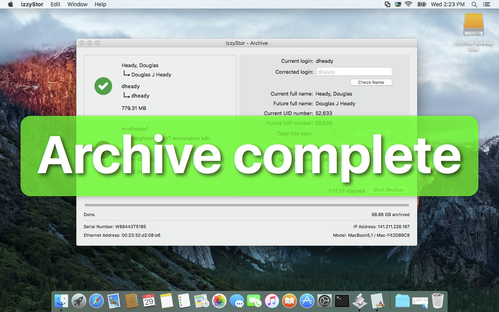
Upon completion of a successful backup, IzzyStor will display a large green banner which reads “Archive complete”. Alternatively, IzzyStor will display a yellow banner which reads “Archive complete with warnings” or a red banner which reads “Archive Failed”.
If there was user data outside of the standard backup locations, check the build sheet and place all manually copied data back into their original locations.
Restoring a IzzyStor Archive
NOTE: When restoring a user account, please log into the "um-support" account to run the restoration!
Open Run IzzyStor
(NOTE – Please see the steps above as to how to launch IzzyStor on 10.15 and above – especially if you backed up an older OS system and are now restoring to something on 10.15 or greater...)
Upon opening Run IzzyStor, select the “Restore” option.
Choose the Storage Disk where the IzzyStor backup resides
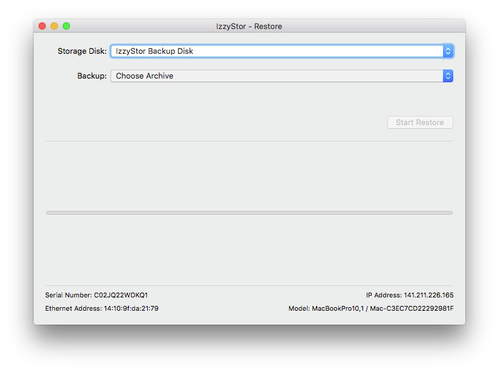
Choose the Archive you would like to restore
You will be presented with a list of all available IzzyStor backups on the storage disk you have selected. You will not see accounts you have chosen to ignore during the archive process.
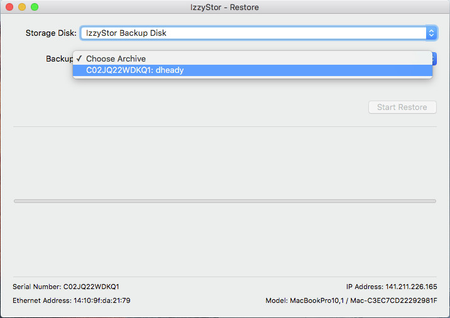
Once you have selected an archive to restore the Start Restore button will activate. Select Start Restore and monitor the progress.
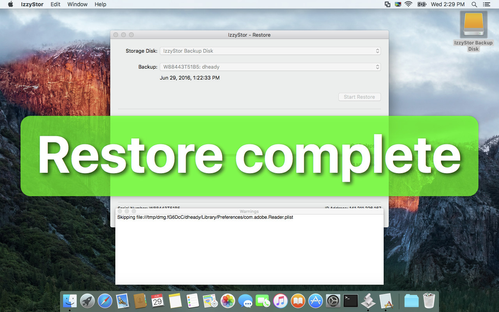
You will be presented with restore status progress on the IzzyStor – Restore window.
Upon completion of a successful backup, IzzyStor will display a large green banner which reads “Restore complete”. Alternatively, IzzyStor will display a yellow banner which reads “Restore complete with warnings” or a red banner which reads “Restore Failed”.
Be sure to note any warnings in the Warnings popup window.
Troubleshooting:
If – after the restore – when the user logs in and anything seems amiss ("keychain" prompts when trying to log in, or permissions issues trying to open certain files or folders) – please log back in to UM-Support, open Service Provider Support and run the “Reset Home Directory Permissions” task — and that should fix it.